10ml Cordyceps militaris liquid culture syringe (sterile)
Sterile alcohol preparation wipe
18G sterile injection needle for easy inoculation
Secure ziplock packaging for protection during transit
Liquid culture is a scientifically formulated nutrient medium designed to support robust mycelium development. Our proprietary blend combines distilled water with malt extract & peptones—creating an optimal feeding substrate for vigorous fungal growth. Think of liquid culture as premium "mushroom seed"; this viable culture can be introduced into your preferred growing medium or cultivation kit to initiate your mushroom production cycle.
Begin by preparing your growing medium with sterilised brown rice as the primary substrate. Mix approximately 20-25 grams of brown rice per pint jar with a nutrient solution consisting of:
Light malt extract (1 tablespoon per 500ml)
Nutritional yeast (1 tablespoon per 500ml)
Distilled water (500ml)
Soak the brown rice in water for 30 minutes, then thoroughly wash and allow to air-dry for 30 minutes before adding the nutrient solution. Pour approximately 40ml of nutrient solution per jar and cover with an autoclavable cap or polypropylene bag.
Sterilise your prepared substrate jars in a pressure cooker at 15 PSI for 40-50 minutes. This critical step eliminates competing microorganisms and contaminating spores. Once sterilised, allow the jars to cool to room temperature before proceeding with inoculation—typically overnight cooling is recommended.
Using proper sterile technique within a still air box or laminar flow hood (to minimise contamination risk), inject 5-10ml of liquid culture directly into the sterilised substrate jar using your sterile syringe and needle. For best results, distribute the liquid culture across the entire substrate surface by inoculating in a circular motion pattern. Seal the lids immediately after inoculation.
Place inoculated jars in complete darkness at temperatures of 18-22°C (65-72°F) for 7-10 days. Maintain humidity levels between 65-70%. During this phase, you'll observe mycelial growth—a white, fuzzy appearance spreading throughout the substrate. This indicates successful colonisation. Do not expose to light during this stage, as premature exposure can cause undesirable mycelial overgrowth.
Once full colonisation is achieved (mycelium completely covers the substrate surface), move jars to a well-lit environment. Provide 12-14 hours of daily light using a 6500K white LED light source (avoid incandescent lights that emit heat). Maintain temperatures between 18-20°C (65-68°F) and humidity at 70-80%. The mycelium will gradually develop an orange colouration during this phase—a natural and positive indicator of maturation.
From this point, expect the following progression:
7 days: Yellowing of substrate surface
2 weeks: Bubble and pinhead formation begins
5-6 weeks: Fruiting bodies expand to harvestable size (4-6cm height)
Total cultivation time: Approximately 3 months from inoculation to final harvest
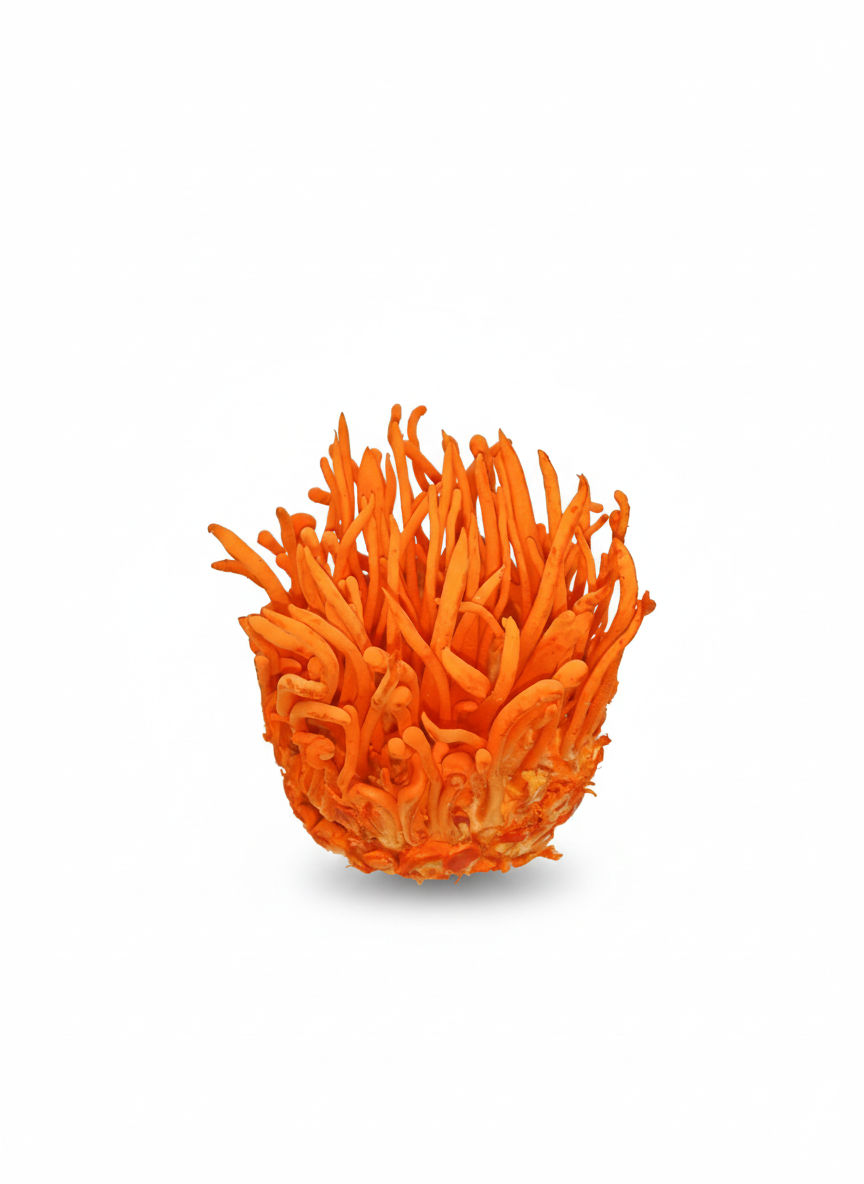
When fruiting bodies develop the characteristic club shape with distinct orange-red colouration, they are ready for harvest. Simply pluck mushrooms from the substrate and dry them for storage or immediate use.
For optimal results, we recommend inoculating your substrate or grow kit immediately upon receipt. If immediate use isn't possible, store your culture in the refrigerator where it will remain viable for up to 3 months.
Every liquid culture in our product line is meticulously prepared fresh in our laboratory for your specific order. We employ a certified flow hood during all culturing procedures to eliminate contamination risk and ensure sterile, viable cultures. Our comprehensive quality assurance protocol includes routine testing on both agar and grain substrates—guaranteeing that you receive only the highest-grade, viable cultures backed by our commitment to excellence.
10ml Cordyceps militaris liquid culture syringe (sterile)
Sterile alcohol preparation wipe
18G sterile injection needle for easy inoculation
Secure ziplock packaging for protection during transit
Liquid culture is a scientifically formulated nutrient medium designed to support robust mycelium development. Our proprietary blend combines distilled water with malt extract & peptones—creating an optimal feeding substrate for vigorous fungal growth. Think of liquid culture as premium "mushroom seed"; this viable culture can be introduced into your preferred growing medium or cultivation kit to initiate your mushroom production cycle.
Begin by preparing your growing medium with sterilised brown rice as the primary substrate. Mix approximately 20-25 grams of brown rice per pint jar with a nutrient solution consisting of:
Light malt extract (1 tablespoon per 500ml)
Nutritional yeast (1 tablespoon per 500ml)
Distilled water (500ml)
Soak the brown rice in water for 30 minutes, then thoroughly wash and allow to air-dry for 30 minutes before adding the nutrient solution. Pour approximately 40ml of nutrient solution per jar and cover with an autoclavable cap or polypropylene bag.
Sterilise your prepared substrate jars in a pressure cooker at 15 PSI for 40-50 minutes. This critical step eliminates competing microorganisms and contaminating spores. Once sterilised, allow the jars to cool to room temperature before proceeding with inoculation—typically overnight cooling is recommended.
Using proper sterile technique within a still air box or laminar flow hood (to minimise contamination risk), inject 5-10ml of liquid culture directly into the sterilised substrate jar using your sterile syringe and needle. For best results, distribute the liquid culture across the entire substrate surface by inoculating in a circular motion pattern. Seal the lids immediately after inoculation.
Place inoculated jars in complete darkness at temperatures of 18-22°C (65-72°F) for 7-10 days. Maintain humidity levels between 65-70%. During this phase, you'll observe mycelial growth—a white, fuzzy appearance spreading throughout the substrate. This indicates successful colonisation. Do not expose to light during this stage, as premature exposure can cause undesirable mycelial overgrowth.
Once full colonisation is achieved (mycelium completely covers the substrate surface), move jars to a well-lit environment. Provide 12-14 hours of daily light using a 6500K white LED light source (avoid incandescent lights that emit heat). Maintain temperatures between 18-20°C (65-68°F) and humidity at 70-80%. The mycelium will gradually develop an orange colouration during this phase—a natural and positive indicator of maturation.
From this point, expect the following progression:
7 days: Yellowing of substrate surface
2 weeks: Bubble and pinhead formation begins
5-6 weeks: Fruiting bodies expand to harvestable size (4-6cm height)
Total cultivation time: Approximately 3 months from inoculation to final harvest
When fruiting bodies develop the characteristic club shape with distinct orange-red colouration, they are ready for harvest. Simply pluck mushrooms from the substrate and dry them for storage or immediate use.
For optimal results, we recommend inoculating your substrate or grow kit immediately upon receipt. If immediate use isn't possible, store your culture in the refrigerator where it will remain viable for up to 3 months.
Every liquid culture in our product line is meticulously prepared fresh in our laboratory for your specific order. We employ a certified flow hood during all culturing procedures to eliminate contamination risk and ensure sterile, viable cultures. Our comprehensive quality assurance protocol includes routine testing on both agar and grain substrates—guaranteeing that you receive only the highest-grade, viable cultures backed by our commitment to excellence.