

How to Grow Lion's Mane Mushrooms Using a Ready-to-Inoculate Grow Bag
Lion’s Mane mushrooms (Hericium erinaceus) are distinctive white gourmet mushrooms covered in soft, hanging spines. They grow naturally on hardwood and are well suited to indoor cultivation using a sterilised hardwood substrate.
This beginner-friendly guide explains how to grow Lion’s Mane mushrooms using liquid culture and an all-in-one hardwood grow bag. It covers inoculation, colonisation, mixing, fruiting, harvesting and common growing problems.
What You Need
- Lion’s Mane liquid culture
- Ready-to-inoculate hardwood mushroom grow bag
- A sterile syringe needle
- Alcohol wipes or 70% isopropyl alcohol
- Clean disposable gloves, if available
- A clean work surface
- A fine-mist spray bottle for fruiting
- A thermometer and hygrometer
The all-in-one grow bag contains sterilised grain at the bottom and supplemented hardwood substrate above it. This allows the entire growing process to take place inside one sealed bag.
Understanding the All-in-One Grow Bag
The grow bag contains two main sections:
- Sterilised grain at the bottom
- Sterilised hardwood substrate above the grain
The liquid culture is injected into the grain layer first. The Lion’s Mane mycelium colonises this nutritious grain before it is mixed through the hardwood substrate.
Important: Inject the liquid culture into the grain at the bottom of the bag, not into the hardwood layer at the top.
Inoculating the Grow Bag
Step 1: Store and Prepare the Liquid Culture
Keep your Lion’s Mane liquid culture refrigerated at approximately 2°C to 8°C until you are ready to use it.
Remove the syringe from the refrigerator shortly before inoculation. Allow it to warm naturally for a short period, but do not place it near a heater or in direct sunlight.
The white material suspended inside the syringe is living mushroom mycelium. Gently shake or rotate the syringe to distribute it through the liquid before use.
Step 2: Prepare a Clean Workspace
Choose a clean room with little air movement. Avoid working beside an open window, fan, heater or busy kitchen area.
- Wash your hands thoroughly.
- Clean and dry the work surface.
- Wipe the outside of the grow bag.
- Wipe the black self-healing injection port.
- Put on clean gloves, if available.
- Keep the sterile needle covered until it is needed.
The grow bag is already sterilised and should remain sealed during inoculation and colonisation.
Step 3: Attach the Sterile Needle
Remove the cap from the liquid-culture syringe without touching the syringe tip.
Open the sterile needle packet and screw the needle firmly onto the syringe. Keep the protective needle cover in place until you are ready to inoculate.
Once the needle has been uncovered, do not allow it to touch your hands, clothing, work surface or the outside of the grow bag.
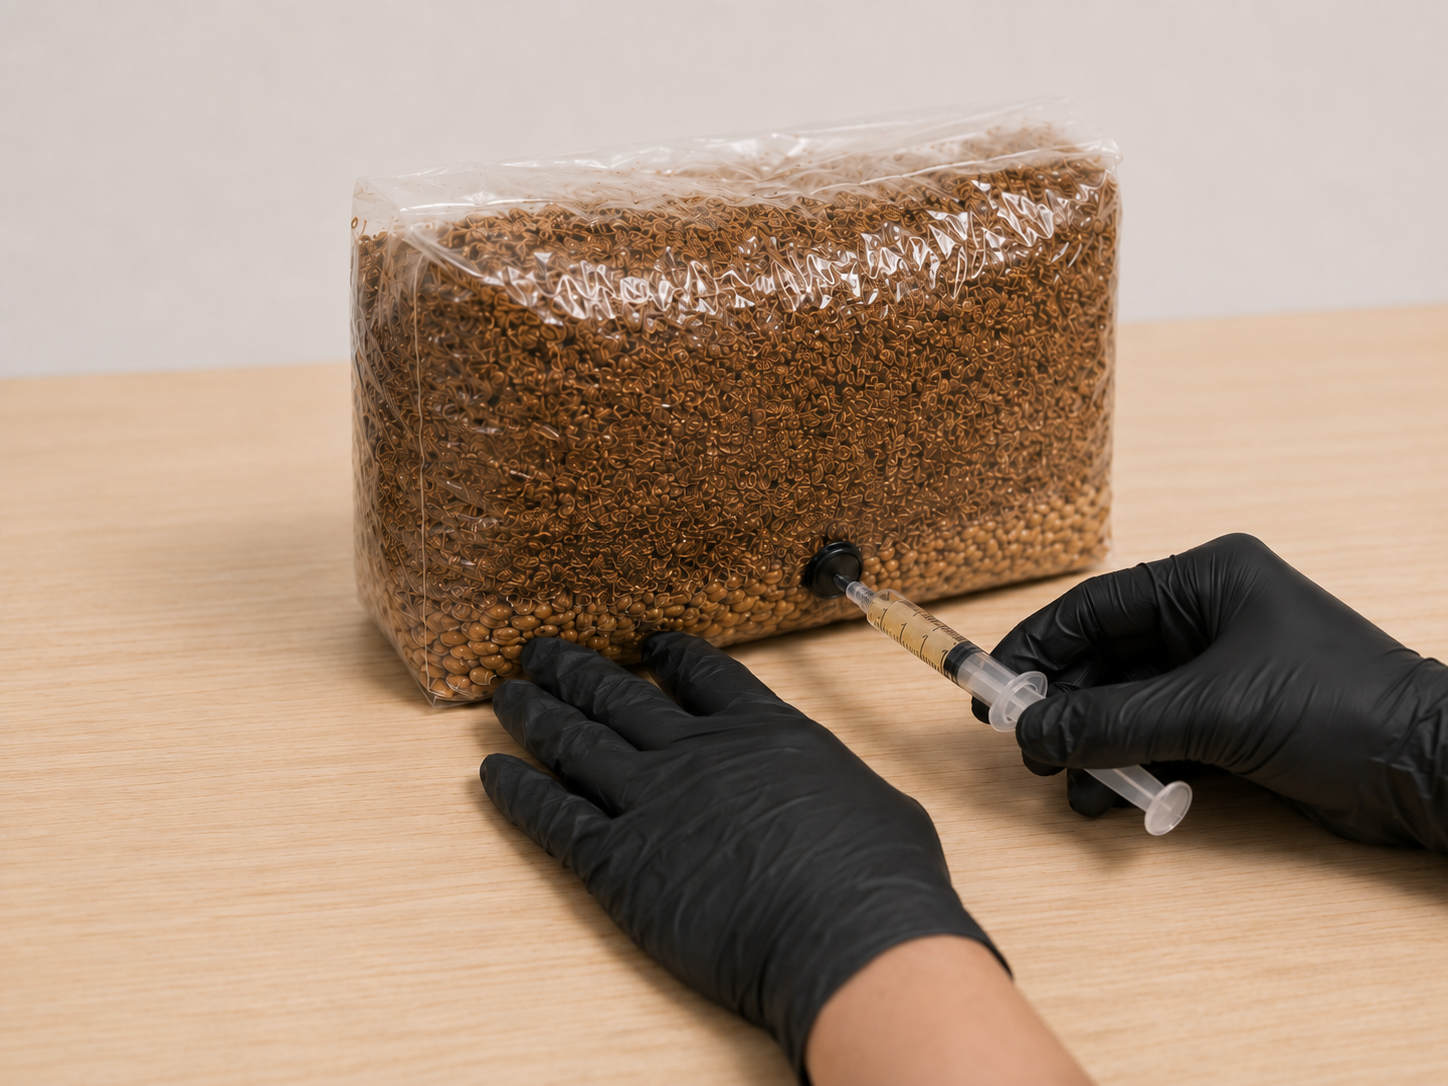
Step 4: Inject the Grain Layer
Wipe the black self-healing injection port with an alcohol wipe and allow it to dry briefly.
Insert the sterile needle through the centre of the port and direct it towards the grain layer at the bottom of the bag.
For a 2 kg all-in-one grow bag, approximately 3 to 5 ml of healthy liquid culture is normally sufficient. Inject the culture into two or three nearby areas of the grain where possible.
Withdraw the needle carefully. The injection port should close around the needle hole. Leave the bag sealed.
Colonising and Mixing the Grow Bag
Step 5: Allow the Grain Layer to Colonise
Place the inoculated grow bag upright in a clean location away from direct sunlight. A temperature of approximately 20°C to 24°C is suitable for colonisation.
Make sure the filter patch is not blocked, folded underneath the bag or pressed tightly against another surface. The filter patch allows the living mycelium to exchange gases while helping protect the contents.
The first visible growth normally appears as small patches of fine white mycelium around the grain. Depending on temperature and culture vigour, this may take approximately one to three weeks.
Lion’s Mane mycelium can look thin, wispy and less obvious than oyster mushroom mycelium. Fine white growth spreading between the grains is usually normal.
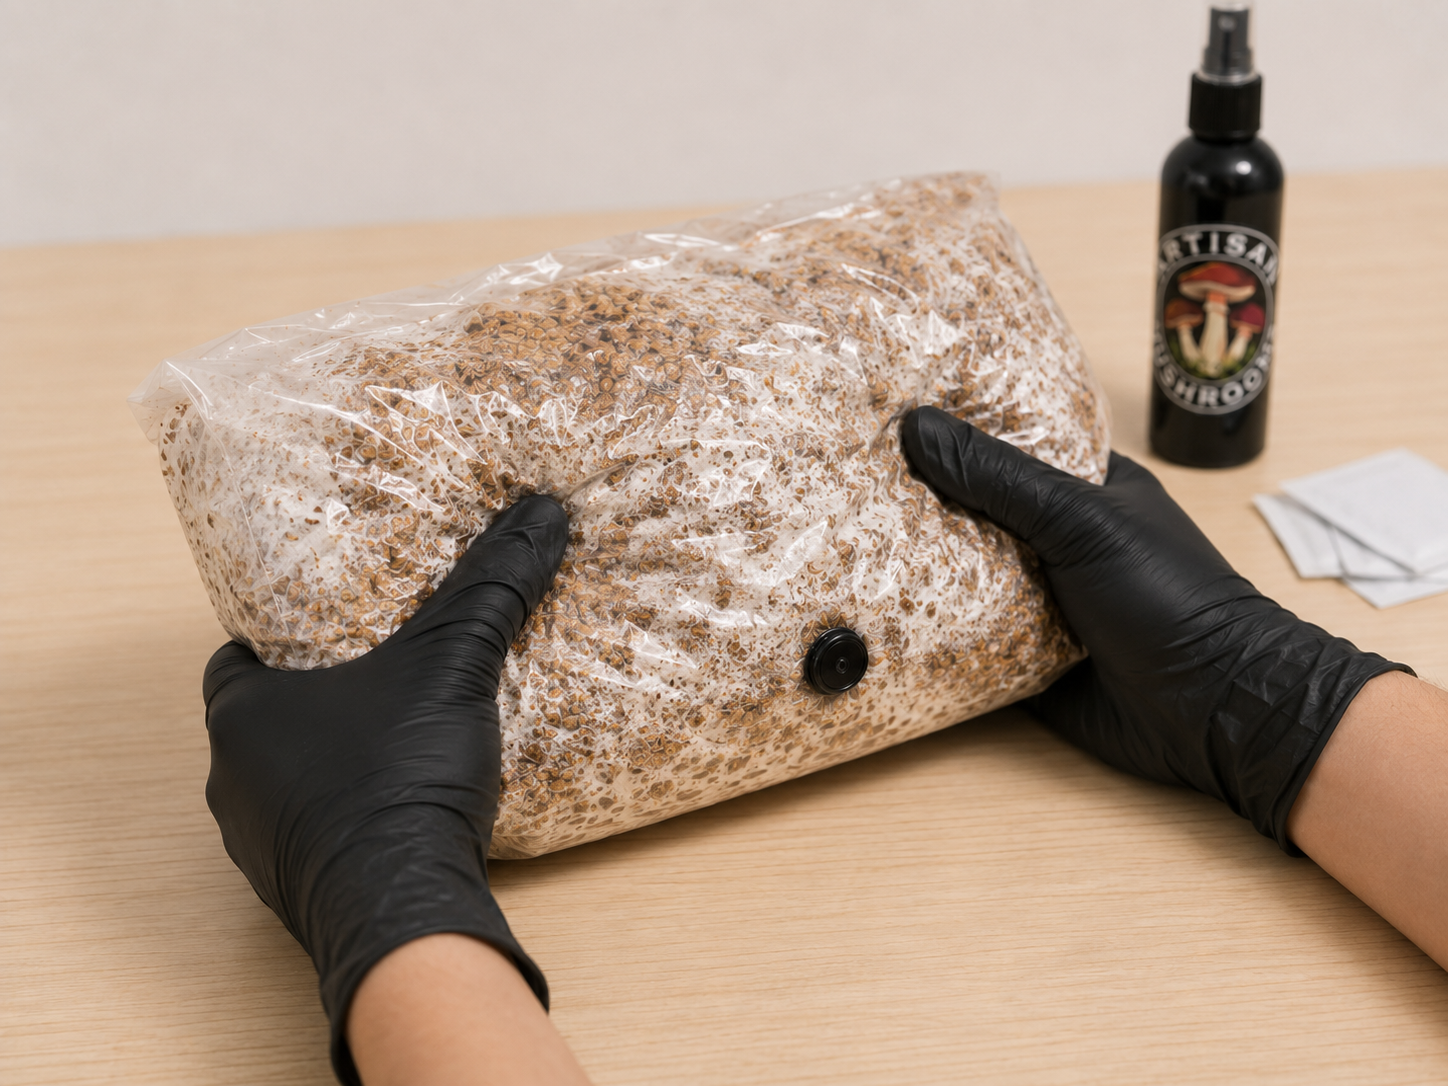
Step 6: Break and Mix the Colonised Grain
When approximately 20% to 30% of the grain appears colonised, gently break up the white colonised areas through the outside of the sealed bag.
Massage the grain carefully until the colonised grains are distributed throughout the remaining grain layer. Do not open the bag and do not use excessive force.
After mixing, reform the grain into a compact layer at the bottom and return the bag to its colonisation area.
The mycelium may temporarily look less visible after mixing. This is normal. It should recover and begin spreading more evenly through the grain over the following days.
Step 7: Mix the Grain Through the Hardwood Substrate
Wait until the grain layer is mostly or fully colonised before mixing it through the hardwood substrate above it.
Break up the colonised grain and hardwood substrate through the outside of the sealed bag. Continue gently massaging the bag until the grain is distributed as evenly as possible throughout the hardwood material.
The substrate block may initially feel firm. Work gradually rather than squeezing or pulling the plastic aggressively.
Keep the bag completely sealed while mixing. The grain and hardwood should be mixed through the plastic without opening the top of the bag.
Step 8: Reform and Colonise the Full Block
After mixing, lightly tamp the bottom of the bag against a clean, solid surface to help the material settle into a compact block.
Do not compress it so firmly that all air spaces are removed. The aim is to create an even, stable block rather than an extremely hard one.
Return the bag to its colonisation area. The Lion’s Mane mycelium will gradually spread through the hardwood substrate over the following weeks.
The block is approaching fruiting readiness when:
- White mycelium has spread through most of the substrate
- The block holds together firmly
- Large loose or uncolonised areas are no longer visible
- Small white lumps may begin forming against the plastic
- There are no green, black, pink or orange patches
- There are no wet, slimy or foul-smelling areas
Lion’s Mane mycelium may remain thinner and less solid-looking than the mycelium of many oyster species. Allow additional colonisation time when uncertain rather than fruiting the block too early.
Fruiting Your Lion’s Mane Block
Step 9: Create the Fruiting Opening
Lion’s Mane is normally fruited from the side of the grow bag rather than from an open top.
Choose an area where the block is well colonised or where small white lumps are beginning to press against the plastic.
Using clean scissors or a clean blade, make a small X-shaped cut in the side of the bag. An opening approximately 3 to 5 cm across is normally sufficient.
Gently press excess air from the top of the bag and fold the unused plastic against the block. This helps direct the mushroom towards the opening.
Do not remove the entire plastic bag from the block. The plastic helps retain moisture and reduces the exposed area of the substrate.
Lion’s Mane Fruiting Conditions
- Temperature: approximately 15°C to 21°C
- Humidity: approximately 85% to 95%
- Light: gentle indirect daylight or room lighting
- Fresh air: regular air exchange is essential
- Fruiting position: through a small side opening
Step 10: Provide Humidity, Light and Fresh Air
Humidity
Maintain a humid environment around the developing mushroom. A humidity tent, clear storage box or small fruiting chamber can be used, but it should never be completely airtight.
Use a fine-mist spray bottle to mist the walls of the fruiting area or the air around the block.
Avoid repeatedly spraying the mushroom directly. Large water droplets sitting on the fruiting body can cause yellowing or bacterial damage.
Fresh Air
Lion’s Mane needs regular fresh-air exchange. Poor airflow can cause the mushroom to form thin, branching or coral-like growth instead of a compact rounded fruiting body.
Open the fruiting chamber regularly or provide small ventilation openings. Increase fresh air if the growth begins looking stretched or coral-like.
Light
Strong light is not required. Normal indirect daylight or gentle room lighting is sufficient.
Keep the block away from direct sunlight, which can dry or overheat the mushroom.
What Healthy Lion’s Mane Growth Looks Like
Young Lion’s Mane usually begins as a small white lump emerging through the opening.
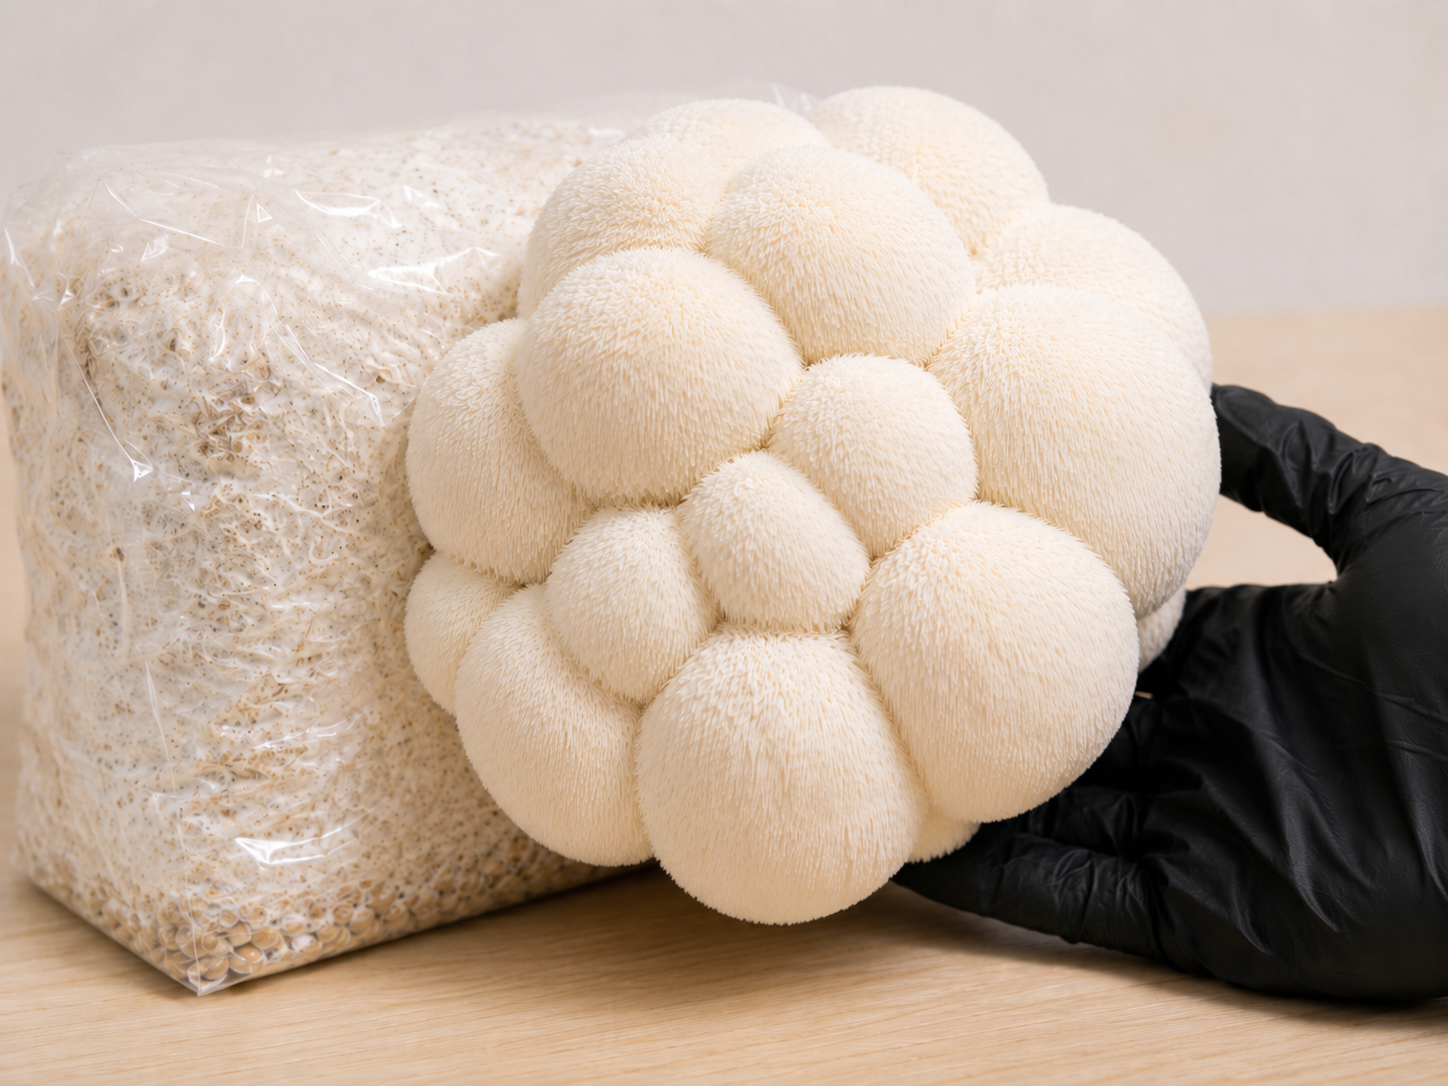
As it develops, it forms a rounded or irregular white mass. Fine hanging teeth or spines gradually appear and lengthen as the mushroom matures.
Healthy growth should normally be:
- White to pale cream
- Firm and fresh-looking
- Free from wet or slimy areas
- Free from green, black, pink or orange mould
- Mild and mushroom-like in smell
A small amount of cream or pale yellow colouring can develop as the mushroom matures. Heavy yellowing usually suggests age, dryness, excessive heat or direct spraying.
Harvesting Lion’s Mane Mushrooms
Step 11: Know When Your Lion’s Mane Is Ready
Lion’s Mane is ready to harvest once it has developed clear hanging spines but is still white, firm and fresh.
The spines are commonly around 0.5 to 1 cm long when the mushroom is approaching maturity.
Harvest before the fruiting body:
- Becomes heavily yellow or brown
- Develops dry or brittle edges
- Begins releasing large amounts of spores
- Feels soft, wet or damaged
A slight cream colour is normal, but widespread yellowing usually means the mushroom is becoming overmature or the growing conditions need adjustment.
Step 12: Harvest the Mushroom
Wash your hands or put on clean gloves before handling the mushroom.
Support the Lion’s Mane gently with one hand. Twist it carefully away from the block, or use a clean knife to cut it close to the fruiting opening.
Avoid pulling forcefully because this may remove a large piece of substrate from the block.
Remove any small pieces of mushroom remaining around the opening. This helps keep the fruiting area clean before the next flush.
Refrigerate the harvested mushroom promptly. Fresh Lion’s Mane is best used while it remains firm and white.
Step 13: Encourage a Second Flush
After harvesting, allow the block to rest for approximately one to two weeks.
Keep the block in suitable fruiting conditions with regular fresh air and moderate humidity, but avoid soaking the exposed opening.
A second mushroom may begin forming from the original opening. If no new growth appears after the resting period, you can make another small X-shaped opening on a different well-colonised side of the block.
Later flushes are often smaller than the first harvest, but a healthy block may produce more than one crop.
Quick Harvest Checklist
- The mushroom is still white or pale cream
- Distinct hanging spines have developed
- The fruiting body feels fresh and firm
- There is no heavy yellowing or browning
- The edges have not begun drying out
Common Lion’s Mane Growing Problems
No Mycelium Is Appearing in the Grain
Visible growth can take approximately one to three weeks, particularly when the room is cool. Lion’s Mane mycelium is also naturally thin and may be difficult to see during the early stages.
Slow or absent growth may be caused by:
- Low incubation temperatures
- Liquid culture injected into the hardwood instead of the grain
- An old or damaged culture
- Excessively wet grain
- Hidden bacterial contamination
Keep the bag at approximately 20°C to 24°C and allow sufficient time before assuming it has failed.
The Mycelium Looks Thin or Wispy
Lion’s Mane mycelium is usually finer and less dense-looking than oyster mushroom mycelium.
Look closely for pale white strands spreading between the grains. Thin growth does not automatically mean the culture is unhealthy.
The Mushroom Looks Coral-Like
Long, branching or coral-like growth usually indicates insufficient fresh-air exchange.
Increase ventilation while continuing to maintain suitable humidity. Do not seal the fruiting chamber completely.
The Lion’s Mane Is Turning Yellow
Yellowing can be caused by:
- Direct or excessive misting
- Low humidity
- High temperatures
- Poor fresh-air exchange
- Water sitting on the mushroom
- The mushroom becoming overmature
Mist the surrounding fruiting area rather than soaking the mushroom directly. Harvest promptly when the spines are developed and the mushroom is still fresh.
The Mushroom Is Drying or Turning Brown
Dry or brown edges usually indicate low humidity, excessive airflow or high temperatures.
Increase the humidity around the block while avoiding heavy direct spraying. Move the block away from heaters, radiators and direct sunlight.
Green Mould Has Appeared
Green mould is commonly associated with Trichoderma contamination.
Move the affected bag away from other mushroom projects immediately. Avoid opening a heavily contaminated bag indoors because this can release mould spores into the growing area.
A heavily contaminated block should normally be discarded.
The Bag Smells Sour, Sweet or Rotten
Sour, fermented, overly sweet or rotten odours may indicate bacterial contamination.
Healthy mushroom mycelium should have a mild, fresh and mushroom-like smell. Do not attempt to fruit a block that is wet, slimy and foul-smelling.
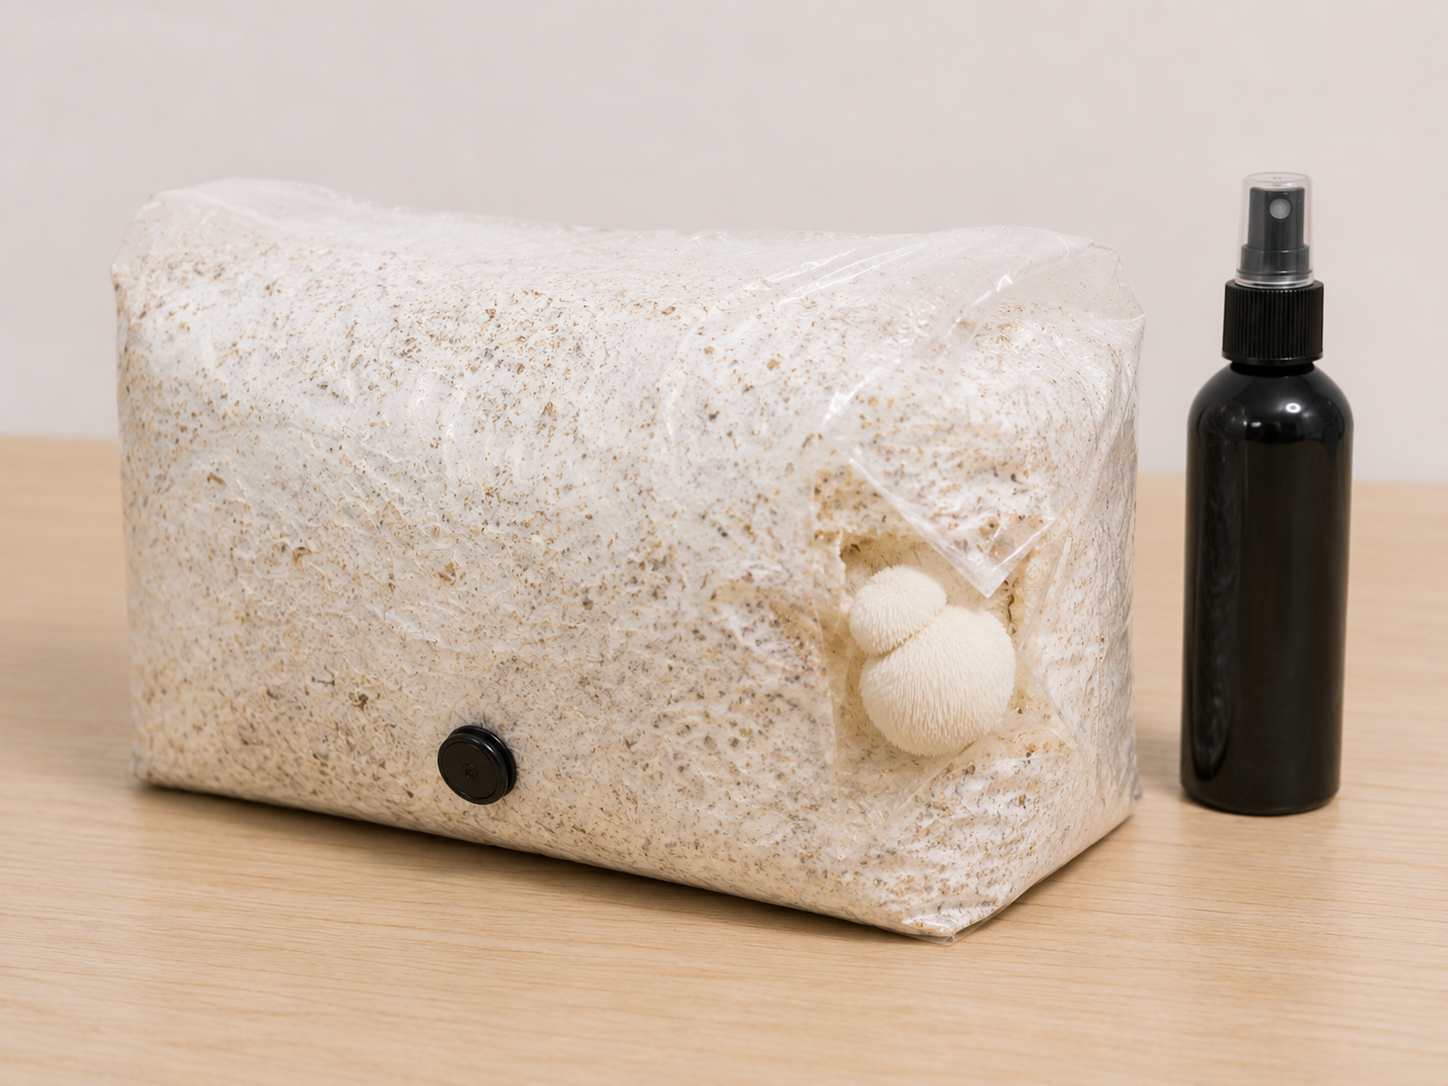
Mushrooms Are Growing Inside the Sealed Bag
Lion’s Mane often begins forming small white fruiting bodies inside the plastic once the block is fully colonised.
Make a small X-shaped opening close to the strongest white growth. Press excess air from the top of the bag and fold the loose plastic against the block to encourage growth through the opening.
Frequently Asked Questions
How Much Liquid Culture Should I Inject?
Approximately 3 to 5 ml of healthy Lion’s Mane liquid culture is normally sufficient for one 2 kg all-in-one grow bag.
Adding more liquid does not necessarily speed up colonisation and may introduce unnecessary moisture.
Can I Inject the Entire 10 ml Syringe?
A full 10 ml syringe is generally more than one 2 kg bag requires. The remaining culture can be refrigerated for later use if the syringe and needle have remained clean.
Can Lion’s Mane Grow on Grain Alone?
Grain is excellent for expanding Lion’s Mane mycelium, but it is not the preferred final fruiting substrate.
Lion’s Mane normally produces better fruiting results on a supplemented hardwood substrate.
Should I Open the Top of the Grow Bag?
No. Lion’s Mane is normally fruited through a small opening in the side of the bag.
Opening the entire top exposes too much substrate, increases moisture loss and may encourage mushrooms to form in unsuitable positions.
Does Lion’s Mane Need Complete Darkness?
No. Normal indirect daylight or gentle room lighting is suitable. Avoid strong direct sunlight.
How Long Does Lion’s Mane Take to Grow?
The complete process normally takes several weeks. Colonisation speed depends on temperature, culture strength and how evenly the grain is mixed through the substrate.
Fruiting generally develops more quickly once a fully colonised block is placed into suitable humidity and fresh-air conditions.
Can I Use Agar Culture Instead of Liquid Culture?
Agar culture is normally transferred to sterilised grain under clean or sterile conditions. Agar wedges should not be pushed through the injection port of an all-in-one grow bag.
Liquid culture is generally the simpler option for beginners using a sealed grow bag.
How Many Flushes Can One Block Produce?
A healthy Lion’s Mane block may produce more than one flush. The first is normally the largest, while later harvests are often smaller.
Allow the block to rest for approximately one to two weeks between flushes.
Start Growing Lion’s Mane at Home
For a simple beginner setup, pair a healthy Lion’s Mane liquid culture with a ready-to-inoculate hardwood mushroom grow bag. The bag already contains sterilised grain and supplemented hardwood substrate, so you do not need to prepare or pressure-sterilise the materials yourself.